What is Google Ad Manager?
Google Ad Manager is an ad management tool for internet companies. It offers extensive management and support for a variety of ad exchanges and networks, including AdSense, Ad Exchange, third-party networks, and third-party exchanges.
If you want to know more about the key features of Ads Manager, click see more
How does Google Ad Manager work?
Google Ad Manager is used to handle all of their advertising. You may create, manage, and report on your advertising campaigns, as well as specify your ad inventory, inside this portal.
- Identifying your ad inventory is the first step. We refer to these as ad units. This is where you wish to display ads on your website or mobile application
- Ad Manager creates and ads a tag to your website or application instantly. The ad tag requests an advertisement from the Ad Manager when a user accesses the website or application
- Ad Manager selects the most appropriate advertisement to display at the moment of request from a generated list of orders and line items.
How to setting up Google Ad Manager?
Sign Up
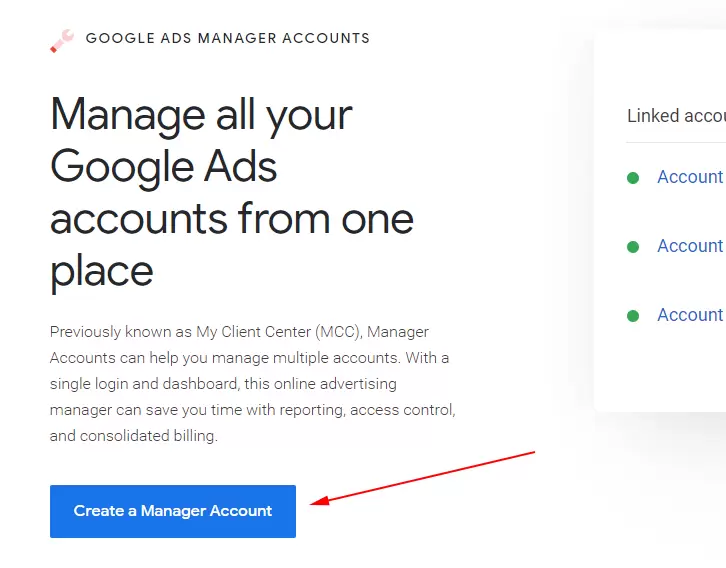
With Google Support website, the process of signing up for Google Ad Manager is very easy.
- Go to admanager.google.com to sign up for an Ad Manager account
- Click Create account and choose to manage my business
- Follow the steps to complete the sign-up
- Naming your account
- Choosing a time zone
- Choosing a currency
- Choosing whether you want an Ad Sense account or not
Your initial activities using Google Ad Manager
Create Ad Units

The first thing you should do after registering is make an ad unit. One or more Google advertisements that appear as a consequence of a single AdSense ad code segment are referred to as ad units.
- Go to Inventory > New ad unit > One level below Network
- In the corresponding ad tag, enter the Code that will be used to identify the ad unit.
- Choose the ad unit Size that you want
- Select Top or Blank from the Target window. If you choose Top, clicking on the advertisement will load the landing page in the currently open tab. Choose Blank to open the landing page in a new tab.
Create A New Order
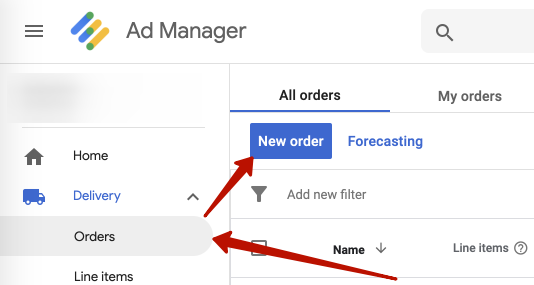
- Click Order > New order
- Enter the Name of the advertiser
- Add new company
- Choose the one that suits your requirements Advertiser, Ad Network, and House Advertiser
- In the Trafficker space, enter your email address here.
Create a New Line Item
- Just as before, click Order > New line item.
- Select the line item type that you want, with Display, Video, or Audio.
- Enter the Name of the line item.
- Under Inventory sizes, add the sizes of line items.
- Next, configure Settings and adjust the Delivery. There are three types of delivery:
- Guaranteed
- Non-Guaranteed
- Ad networks and Ad exchange
Delivery is a complex topic and one which deserves its own article. Each of the sections mentioned above is subdivided into many more subsections, including standard, sponsorship, AdSense, Ad Exchange, bulk, house, etc.
Add Targeting
- First, click Inventory. Select all ad inventories where you want to display targeted ads
- Now we will enter the locations where we want to display the ads by clicking Geography
- Next, click User Domains to target users coming from specific websites
- The Browsing option is for the purpose of targeting visitors based on their browsing details.
Define Ad Creative
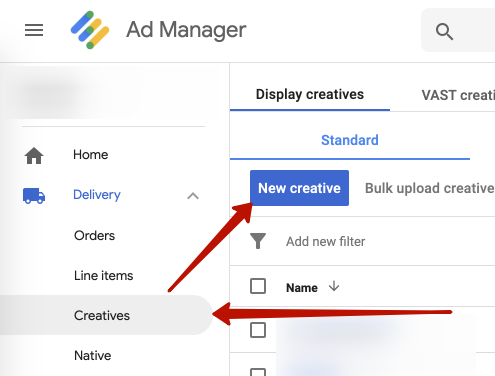
- Click on New creative
- Select the advertiser you wish
- Name the ad creative
- Specify Target ad unit size
- Enter the Click-through URL in the designated field
- Lastly, select any Associated ad technology providers if there are any.
Generate Ad Tags

- Click Inventory > Generate tags.
- Select the ad units for which you want to create ad tags, and click Generate tags.
- Next, we have to select which Tag type we want to use, either Google Publisher Tag, Mobile Application Tag, or AMP Tag.
- Tick the Enable Single Request
- If you want to collapse the ad unit when it is unfilled, then also select Collapse Empty Divs.
- Now you need to copy the generated tag for the header and paste it to the header code of your website.
- Lastly, copy the tags generated and paste them below <body> tag of your website’s source code.
That’s it! Once you’ve completed all the above steps, your Google Ads Account and the ad server are ready to serve ads on your website.


